There is a common belief that top-class software developers can do their job without ever abandoning the terminal.
I think this is true to some extent.
It is almost impossible to become an outstanding software developer without knowing how to get the most out of the terminal.
Personally, I treat my Unix shell as a very good friend.1
And the terminal for me is the bar where I go with this friend to drink and have a good time.
As it is more enjoyable drinking with civilized friends in civilized places,2 I prefer visiting a bar that is cozy and invites me to cheer.
This blog post is a how-to guide for you (and my future self) to configure the terminal in a way so that we will enjoy every drink command typed on it.
iTerm2
The fist step is getting a better terminal app. I use iTerm2, as a replacement of the standard macOS terminal.
You can install iTerm2 via Homebrew using the following command:
1
brew install --cask iterm2
These are my favorite iTerm2 features:
- Opening a new terminal tab in the current window.
- Opening the terminal from another window with a hotkey (I use
^ + ⌘ + T, as by default in Ubuntu). - Searching with regular expressions.
- Customizing the font (I use Fira Code, 16px).
Oh My Zsh
The second step is getting a better shell.
I use Oh My Zsh, as a shell replacement for macOS.
This is an open-source and popular zsh configuration manager.
It offers a tons of themes, functions, helpers, plugins, and other handy features.
To install Oh My Zsh, execute the following command in the terminal:
1
sh -c "$(curl -fsSL https://raw.github.com/ohmyzsh/ohmyzsh/master/tools/install.sh)"
The configuration file is located at ~/.zshrc.
Themes:
In order to enable a theme, set ZSH_THEME to the name of the theme in your ~/.zshrc, before sourcing Oh My Zsh.
I use ZSH_THEME=gnzh.
1
2
3
4
5
6
7
8
9
10
# Path to your oh-my-zsh installation.
export ZSH="/Users/cesarsv/.oh-my-zsh"

# Set name of the theme to load --- if set to "random", it will
# load a random theme each time oh-my-zsh is loaded, in which case,
# to know which specific one was loaded, run: echo $RANDOM_THEME
# See https://github.com/ohmyzsh/ohmyzsh/wiki/Themes
`ZSH_THEME="gnzh"`

source $ZSH/oh-my-zsh.sh
The gnzh theme is located by default in ~/.oh-my-zsh/themes/gnzh.zsh-theme.
Here’s the full file that I use:
1
2
3
4
5
6
7
8
9
10
11
12
13
14
15
16
17
18
19
20
21
22
23
24
25
26
27
28
29
30
31
32
33
34
35
36
37
38
setopt prompt_subst

() {

GIT_PROMPT='$(git_super_status)'
local PR_USER PR_USER_OP PR_PROMPT PR_HOST

# Check the UID
if [[ $UID -ne 0 ]]; then # normal user
   PR_USER='%F{green}%n%f'
   PR_USER_OP='%F{green}%#%f'
   PR_PROMPT='%f➤ %f'
else # root
   PR_USER='%F{red}%n%f'
   PR_USER_OP='%F{red}%#%f'
   PR_PROMPT='%F{red}➤ %f'
fi

# Check if we are on SSH or not
if [[ -n "$SSH_CLIENT"  ||  -n "$SSH2_CLIENT" ]]; then
   PR_HOST='%F{red}%M%f' # SSH
else
   PR_HOST='%F{green}%M%f' # no SSH
fi

local return_code="%(?..%F{red}%? ↵%f)"

local user_host="${PR_USER}%F{cyan}@${PR_HOST}"
local current_dir="%B%F{blue}%~%f%b"

PROMPT="╭─${user_host} ${current_dir} "%F$FG[240]\$(jenv_prompt_info)%f" $GIT_PROMPT
╰─$PR_PROMPT "
RPROMPT="${return_code}"

ZSH_THEME_JENV_PROMPT_PREFIX="%F{red}‹"
ZSH_THEME_JENV_PROMPT_SUFFIX="›%f"

}
Note that I add jenv_prompt_info in line #31 to show the Java version that I’m currently using directly in the prompt.
You can show the version of other programming languages as well, here is the list of available options.
Also note that I customize the colors via $FG[240], see an explanation here.
I use git-prompt via the global variable $GIT_PROMPT to show the status of the current Git repository when applicable.
Plugins:
Oh My Zsh has a vast list of awesome plugins.
To use a plugin, add the name of the plugin in the ~/.zshrc file.
Here’s an example:
1
2
3
4
5
6
7
8
9
10
11
12
13
14
15
16
17
18
19
20
# Path to your oh-my-zsh installation.
export ZSH="/Users/cesarsv/.oh-my-zsh"

# Which plugins would you like to load?
# Standard plugins can be found in $ZSH/plugins/
# Custom plugins may be added to $ZSH_CUSTOM/plugins/
# Example format: plugins=(rails git textmate ruby lighthouse)
# Add wisely, as too many plugins slow down shell startup.
plugins=(
   git-prompt
   zsh-syntax-highlighting
   zsh-autosuggestions
   aliases
   mvn
   jenv
   sdk
   vscode
)

source $ZSH/oh-my-zsh.sh
These are my favorite Oh My Zsh plugins:
- git-prompt: Displays information about the current git repository. In particular: the branch name, difference with remote branch, number of files staged or changed, etc.
- zsh-syntax-highlighting: Provides syntax highlighting for the shell zsh.
- zsh-autosuggestions: Suggests commands as you type based on history and completions.
- aliases: Lists the shortcuts that are currently available based on the plugins you have enabled.
- mvn: Provides many useful aliases as well as completion for the Apache Maven command (
mvn). - jenv: Initializes
jenvand provides thejenv_prompt_infofunction to add Java version information to prompts. - sdk: Plugin for SDKMAN, a tool for managing parallel versions of multiple Software Development Kits on most Unix based systems. Provides autocompletion for all known commands.
- vscode: Simplifies the interaction between the command line and VS Code or VSCodium editor.
TLDR
TLDR is a handy tool for generating a short summary of a Unix command.
It is helpful when you are trying to find out how to use a command, but you don’t want to read its long and boring man page.
Thus, the TLDR pages are a community effort to simplify the beloved man pages with practical examples.
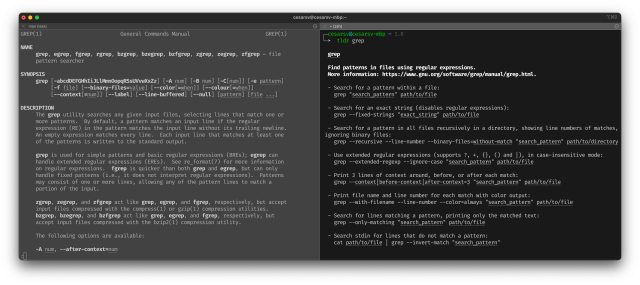
grep command.To install TLDR, execute the following command in the terminal:
1
brew install tldr
Fig
Fig adds IDE-style autocomplete to the terminal. I like it because it makes me feel my terminal more like and IDE.
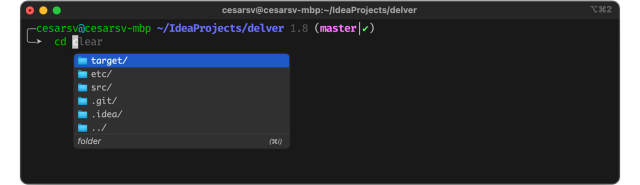
To Install Fig, execute the following command in the terminal:
1
brew install fig
Vim
Vim is a powerful text editor for Unix. It is used by many developers to write code directly in the terminal. I love Vim, despite its steep learning curve.
To install Vim, execute the following command in the terminal:
1
brew install vim
It is very easy to apply different customizations to Vim that totally change how it looks and feels. I use the amix/vimrc scripts to easily customize my Vim environment. This includes a lot of great plugins, configurations and color schemes that make Vim a lot better.
To get and awesome Vim, simply execute the following commands in the terminal:
1
2
git clone --depth=1 https://github.com/amix/vimrc.git ~/.vim_runtime
sh ~/.vim_runtime/install_awesome_vimrc.sh
These commands install several Vim plugins and customizations.
Among other plugins, it installs NERDTree, which is a great tool for file navigation.
To open NERDTree automatically when Vim starts and put the cursor back in the other window, add the following in ~/.vim_runtime/my_configs.vim:
1
autocmd VimEnter * NERDTree | wincmd p
Note: To move the cursor between the NERDTree panel and the edit panel type ctrl + w twice.
SDKMAN!
SDKMAN! is a tool for managing parallel versions of multiple Software Development Kits (SDKs). It provides a convenient CLI and API for installing, switching, removing and listing SDK candidates. For example, you can use SDKMAN! to install the latest version of the Android SDK, or the latest version of the iOS SDK.
You can also switch between different Java JDK versions, as follows:
To install SDKMAN!, execute the following command in the terminal:
1
curl -s "https://get.sdkman.io" | bash
jENV
jEnv is a command line tool to help you forget how to set the JAVA_HOME environment variable.
For example, you you can change the Java version that you are using by simply typing jenv global <version>:
To install jEnv, execute the following command in the terminal:
1
brew install jenv
Jq
Jq is a powerful command-line JSON processor.
It can be used to filter, transform, and query JSON files in the terminal.
And of course, you can get JSON file pretty-printed by typing jq '.'.
To install jq, execute the following command in the terminal:
1
brew install jq
Bat
Bat is a simple and powerful command-line utility for displaying files and directories.
It is a replacement for the cat Unix command, but it is more powerful and more user-friendly.
To install bat, execute the following command in the terminal:
1
brew install bat
Trash-CLI
Trash-cli is a substitute for the dangerous rm command that permanently deletes files.
In contrast, trash-cli moves files to the trash, which is safer because it is reversible.
To install trash-cli, execute the following command in the terminal:
1
brew install trash-cli
Exa
Exa is a modern replacement for the ls command.
To install exa, execute the following command in the terminal:
1
brew install exa
Htop
Htop is a terminal-based process viewer.
It is a replacement for the top Unix command, more user-friendly and more powerful.
To install htop, execute the following command in the terminal:
1
brew install htop
Diff-so-fancy
Diff-so-fancy is a terminal-based diff viewer.
It is a replacement for the diff Unix command.
It makes your diffs human-readable instead of machine-readable.
This helps improve code quality and helps you spot defects faster.
To install diff-so-fancy, execute the following command in the terminal:
1
brew install diff-so-fancy
To make it Git use it as the default, execute the following command in the terminal:
1
git config --bool --global diff-so-fancy.stripLeadingSymbols false
Conclusion
Here we are at the bar, enjoying a tasty after-work beer. Now I open my laptop and look at my beautiful terminal, fully customized and configured to suit my needs. It is beautiful! I close my laptop, and I’m just happy 😄.
Footnotes
I recommend the course “Unix Tools: Data, Software and Production Engineering,” by Prof. Diomidis Spinellis. ↩
Just kidding. ↩