I went back to using Windows lately in my current job.1
But let’s be honest, I don’t enjoy the change.2
Anyway, I’ve to deal with it to do my job right.
One of the things that I miss the most from my previous setup is my nice macOS terminal customizations.
To my knowledge, the Windows native terminal is far behind compared to its Unix counterparts.
However, with some tweaks and extra tools, I manage to tweak the horrendous C:\WINDOWS\system32\CMD into something nicer in terms of L&F and functionality.
In this blog post, I describe the tools I use to resemble my macOS terminal customizations on Windows.
This includes the fonts that I chose for the Windows Terminal app, an enhanced PowerShell, and the installation of third-party tools like Oh My Posh.
I’ve found that these small improvements make me significantly less sad happier when using Windows.
I must say, to me, it’s not only about functionalities, good aesthetics and a great user experience go hand in hand with a certain kind of pleasure that boosts my productivity!
Windows Terminal
The first step is to get a better terminal app. I use Windows Terminal, which offers a lot of nice customization options. For example, it allows many changes in the appearance of the prompts (similar to iTerm), and having multiple tabs with different shells opened like PowerShell, Command Prompt, and Windows Subsystem for Linux (WSL). The app can be downloaded from the Microsoft Store or directly installed from its official GitHub repository.
To install via Microsoft Store, open Microsoft Store, search for “Windows Terminal” and click “Get” or “Install.”
To install via GitHub repository, download the latest release from here and follow the installation instructions provided in the repository.
PowerShell
To make the most of my terminal, I use PowerShell v5 or above instead of the Command Prompt (CMD).
PowerShell is very powerful shell
I’s similar to bash but with a more verbose syntax in my opinion.
Interestingly, PowerShell commands return objects instead of plain text!
This means that you can easily manipulate the output of one command with another command instead of using pipes.
Here’s how to install PowerShell Core on Windows:
- Go to the PowerShell GitHub page.
- Download the latest
.msifile for Windows. - Run the installer and follow the prompts.
Once installed, you can set PowerShell Core as your default profile in the Windows Terminal settings:
- Open Windows Terminal settings (
Ctrl+,). - Under “Startup,” change the default profile to PowerShell.
Lastly, open PowerShell and set the execution policy to allow running scripts:
Set-ExecutionPolicy -ExecutionPolicy RemoteSigned -Scope CurrentUser
Now you can start customizing your PowerShell profile by opening the profile file in notepad, like this:
notepad $PSHOME\Profile.ps1
In this file, you can add custom aliases, functions, and settings to enhance the PowerShell experience. For example, to display command predictions in a list format add the following line:
Set-PSReadLineOption -PredictionViewStyle ListView
Here are my custom aliases:
1
2
3
4
5
6
7
8
9
10
11
12
13
14
15
16
17
18
19
20
21
22
23
24
25
26
27
28
29
30
31
32
33
34
35
36
37
38
39
40
41
# Unix aliases
Set-Alias -Name ls -Value Get-ChildItem
Set-Alias -Name cat -Value Get-Content
Set-Alias -Name rm -Value Remove-Item
Set-Alias -Name mv -Value Move-Item
Set-Alias -Name cp -Value Copy-Item

# Directory navigation aliases
Set-Alias -Name docs -Value 'Set-Location C:\Users\YourUsername\Documents'
Set-Alias -Name dl -Value 'Set-Location C:\Users\YourUsername\Downloads'
Set-Alias -Name desktop -Value 'Set-Location C:\Users\YourUsername\Desktop'

# Process management aliases
Set-Alias -Name ps -Value Get-Process
Set-Alias -Name kill -Value Stop-Process

# Custom Git aliases
function gst {
    git status
}
function gpl {
    git pull
}
function gps {
    git push
}
function gco {
    param (
        [string]$branch
    )
    git checkout $branch
}
function gcm {
    param (
        [string]$message
    )
    git commit -m "$message"
}
function gba {
    git branch -a
}
WSL

The Windows Subsystem for Linux (WSL) allows running a Linux environment on Windows without the need for a virtual machine or dual-boot setup. This is great for me because I’m so accustomed to Unix-like environments and tend to use Linux tools and scripts whenever I can. There are many compatible Linux distributions available in the Microsoft Store (I recommend using Ubuntu or Debian), and it’s easy sharing files between Windows and Linux environments.
WSL works by translating Linux system calls into Windows system calls using a compatibility layer.
There are two versions of WSL: WSL1 and WSL2.
WSL1 uses a translation layer (similar to Wine for Linux on Windows).
WSL2 introduces a real Linux kernel running in a lightweight virtual machine, providing full system call compatibility and improved performance.
WSL distributions are located in the %LOCALAPPDATA%\Packages directory by default.
You can access the Linux file system from Windows via \\wsl$\<distro-name> in the File Explorer.
To enable WSL on Windows follow the official instructions:
- Press
Win + X, then select “Windows PowerShell Admin.” - Enable WSL feature by running:
dism.exe /online /enable-feature /featurename:Microsoft-Windows-Subsystem-Linux /all /norestart - Enable virtual machine feature by running:
dism.exe /online /enable-feature /featurename:VirtualMachinePlatform /all /norestart - Set WSL2 as the default version:
sh wsl --set-default-version 2and restart the PC.
To install a Linux distribution (Ubuntu 20.04 in this case) run the following command in PowerShell:
Invoke-WebRequest -Uri https://aka.ms/wslubuntu2004 -OutFile Ubuntu.appx -UseBasicParsing
To verify the installation run:
wsl --list --verbose
Scoop
Scoop is a command-line package manager for Windows that simplifies the process of installing, updating, and managing software applications.
Think of it as the Windows’ alternative to homebrew or apt-get
I think that Scoop is much better than the default Windows installer because it’s CLI friendly.
It downloads and manages packages in a portable way, which means that it’s not required to have admin rights to install anything.
Once installed, Scoop places the applications in ~\scoop.
To install Scoop, run the following command in PowerShell:
Invoke-RestMethod -Uri https://get.scoop.sh | Invoke-Expression
Here are the basic Scoop commands that I use:
1
2
3
4
5
6
7
8
9
10
# To search for a package
scoop search [package_name]
# To install a package
scoop install [package_name]
# To update a package
scoop update [package_name]
# To list installed packages
scoop list
# To uninstall a package
scoop uninstall [package_name]
Here are a few Scoop packages that I recommend:
| Category | Package name |
|---|---|
| Utility | 7zip, curl, wget, sudo, touch, which, z, gpg, grep, fzf, bat, fd, htop, tldr |
| Development | vscode, git, gh, vim, python, helm, jq, nvm, nodejs, docker, kubectl, terraform |
| Productivity | sublime-text, obsidian, todoist, trello |
| Media | mpv, vlc, youtube-dl, handbrake, gimp |
| Browsers | firefox, chrome, edge |
| Communication | slack, zoom, teams |
Oh My Posh
Oh My Posh is a prompt theme engine for PowerShell that allows customizing the terminal prompt. It is the version for Windows of the super popular Oh My Zsh tool used on Unix-based distros.
To install Oh My Posh using Scoop just run the following command in PowerShell:
scoop install main/oh-my-posh
To set up a theme, you first need to initialize Oh My Posh in your PowerShell profile. Open this profile in Notepad by running the following command:
notepad $PSHOME\Profile.ps1
Add the following line to your profile script:
oh-my-posh init pwsh --config "$env:POSH_THEMES_PATH\\your-theme.omp.json" | Invoke-Expression
Replace your-theme.omp.json with the path to your desired theme (my favorite is pure.omp.json).
You can find themes in the themes folder located where the Oh My Posh repository was installed.
Fonts and Icons
To display certain glyphs and icons correctly in the terminal, you might need Nerd Fonts.
These fonts are created by developers for developers.
They are free, look good, and include extra icons.
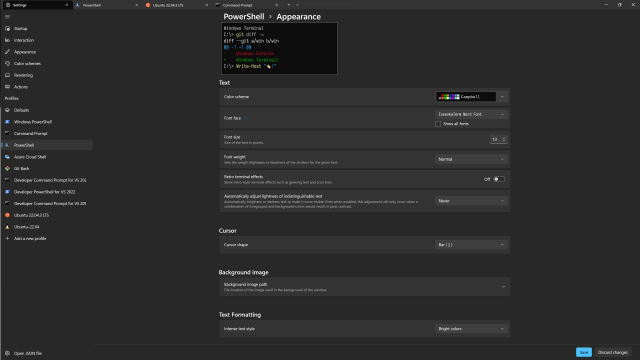
My current favorite is the IosevkaTerm Nerd Font.
Once the font is installed, you can set the font in Windows Terminal settings under the profile appearances tab as shown below:
To display files and folder icons directly in the terminal, add the following line in $PSHOME\Profile.ps1:
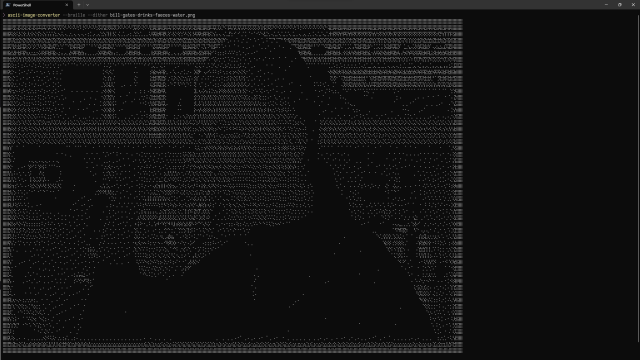
Install-Module -Name Terminal-Icons -Repository PSGallery
After that, you will see nice icons displayed.
Here’s an example of using ll on the base directory of the code that runs this website hosted on GitHub:
Isn’t it beautiful? 😍
Conclusion
Customizing the Windows terminal not only makes its visually appealing but also brings me joy as a developer. I think that, in the long run, that enhances my productivity. In this blog post, I covered how to transform the Windows terminal into a beautiful and efficient workspace. By integrating PowerShell, Oh My Posh, custom fonts, and various plugins, you create a powerful, efficient, and enjoyable workspace directly in your terminal window. You can explore, experiment, and most importantly, tailor your terminal to fit your personal workflow and style. Let me know in the comments below if you know about any other tool that I should recommend 😊.
Footnotes
The last time I used Windows was during the Windows XP era (one of the best versions of Windows ever made I think), that was back when dinosaurs roamed the Earth and dial-up internet was all the rage. Since then, I upgraded my dev experience to Unix-based distros (mostly Ubuntu), and recently, I finally saved enough gold ingots to join the cult of Mac and macOS. ↩
Windows is the darling of most companies (specially non-tech), much like printers and paperweights. Personally, I think that true pro developers try to stay away from Windows. Instead, the crème de la crème prefer Unix-based systems like Arch Linux, or macOS when they want to prioritize high-quality (i.e., Apple-made) hardware. ↩